Monday, 20 June 2016
Back and Mk3 Is here
So my operation is now done and I'm back playing toy soldiers. In the mean time Mk3 has been released (http://www.allnewwar.com) - very excited and can't wait to get playing some games!

Tuesday, 10 May 2016
More Paint for Stompy!
So he's coming along, I doubt he'll win any awards for best painted but I'm happy enough and really liking having painted models on the board!


Wednesday, 4 May 2016
Taking a Stance & Scenery Additions
As the start of the game was a little delayed whilst I waited for Danny I had a rummage through the club scenery and found some smaller terrain templates. I love scenery on a board but find the standard large woods and hills are too restrictive for Warmachine. Using the smaller pieces of terrain we were able to get 7 pieces of terrain on the tabletop that I felt had a really positive effect on the game but without becoming restrictive.
Anson Durst, Rock of the Faith vs. Hoarluk Doomshaper, Rage of Dhunia (Trollbloods)
Loss: Assassination (Scenario - 1/0) This list is based on my findings from the weekends 35 point games, it includes a lot of infantry with a colossal and pair of heavies to do any heavy lifting. I'd also learnt over the weekend to be much more aggressive turn 1 so this was a good occasion to test the theory.
Going first (and following the plan) I ran everything up turn one. Despite little shooting I threw up deflection just in case to protect my support troops and some of the Temple Flameguard. This was pretty much mirrored by Trollblood turn one where everything moved up and his caster hid behind a wood with an Axer.

Turn 2 and clearly Mulg was fancying his chances against the colossal so I was going to have to be careful. To this end the Zealots moved up to create a loose screen, they also mini feated and bombed a few Fennblades and waited for the inevitable counter charge. The Reckoner received Enliven and walked forward in front of Stompy to take the charge from Mulg. Stompy moved forward and fired off rockets at a few targets. With the exception of causing a few points of damage to Doomy (and allowing Mulg a free movement) this was ineffectual. On the left the Flameguard received Dirge of Mists from the piper and moved up in shield wall ready to take a charge from the Champions (Def16/Arm17 should be enough). Durst moved up to the objective with his pet Reckoner and sacrificed his action to stance.
Troll turn 2 started with Doomy blasting a single Zealot with a spell to clear the path. Mulg then charged the Reckoner, hoping for a critical smite to knock it down and stop Enliven. He failed the smite but trashed his movement (14 boxes gone from one hit), but still he could Enliven to safety. Elsewhere the charging Champions killed a single Flameguard, the Fennblades ran in to pin all of the Zealots but could do no damage due to the minifeat. The heros of the turn were the Pyg Burrowers who popped up and trashed 95% of the objective and around 20 boxes on poor Stompy!

So the plan for turn three was to feat, kill Mulg and setup a defensive line ready to do a massive counter attack turn 4. The important part was Mulg so I walked in the battle'd Reckoner and he went to town on Mulg. Causing straight dice damage and having 4 hits I nealy felled the beast, having to use an Ancillary attack to finish him off. He came back via a Feralgeist but i wasn't to bothered, the hard part was done. The Zealots brought down a few Fennblades and continued to jam the flag. On the other flank the Flameguard speared 2 Champions and damaged and set fire to the rest. Stompy then shot point blank at the Pygs in front of him killing 6 leaving just 4 left. The Reckoner next to Durst smashed a Pyg and Durst feated and killed the other Pyg creating an ash cloud in front of him. What I should have done was stanced with Durst which would have completely changed the game.
Troll turn 3 and the assassination was on, I was fairly smug at first thinking that any damage to Durst could be passed onto the Reckoner. Equally whilst they were base to base Durst was effectively Arm19, Def17 vs combat and Def15 vs Shooting - so I thought highly survivable. I also got confused between his feat, Wall of Steel and his stance. I believed that the first 2 meant that he couldn't be knocked down or moved and neither could anyone in base contact. Sadly this is only the case with his paladin stance. So in charged the Mauler (POW19 thanks to the free animus), it slammed the Reckoner knocking it back and out of base to base with Durst. Durst was then knocked down as it passed over him. The Mauler then bought 4 attacks on Durst with damage at straight dice killing him in 3 strikes (no spikes as average rolls would have been 28 damage points from 4 attacks)
Te final positions:

Lessons Learnt -
- More scenery (but smaller) makes for a more enjoyable playing experience as it really starts to come into play.
- Durst is a beast in combat and pretty dam solid but a charging heavy will always kill a caster.
- Stancing is very important and unless there's a reason I can't then it must be done every turn, just in case!
- I really like this list and I'm looking forward to trying it out again next week!
Monday, 2 May 2016
International Tabletop Day - Dursts Day Out!
Our local game store celebrated International Tabletop Games Day so we went along to show off Warmachine/Hordes and help raise some money for 3 children's charities. Each game was 35 points which is a level at which I haven't played much so it was an interesting day. We were also going for the wow factor hence why my lists all had a colossal in.
Anson Durst, Rock of the Faith vs. Lylyth, Herald of Everblight (Legion of Everblight)
Loss: Assassination (Scenario 4/0) The first list was the smallest list I could put together, 35 points = 11 models! Facing me was a fairly large Legion force with only a single colossal. I actually fancied my chances till I got pinned back and then assassinated. My fairly epic failure was not getting Durst base to base with a jack for most of the game to keep him safe. I also struggled with not having anything to jam the Legion infantry meaning that my squishy support pieces got pretty heavily shot up when the couldn't hide behind anything.
The lesson from this game is that colossals aren't great in a 35 point match-up and that I definitely needed some troops to help out!

Anson Durst, Rock of the Faith vs. Warwitch Deneghra (Cryx)
Loss: Scenario (5/0) No photos for the next two I'm afraid!
This game was one of those really blah games that I lost mainly through stupidity and trying to be to clever. The mission was the same but the board was laid out with a building in the middle meaning that I was trying to keep the colossal central and send the Zealots (in place of a Templar) at one whilst the Reckoner and Durst went for the other. I went first so had a bit more ground to cover too which didn't help me much.
The game started well with various shooting picking of a few Cryx pieces (including Stompy trying to snipe points of Deathjack), in response I didn't lose a model but the Cryx horde surged forward into both the objectives. My turn and I bombed and burned where I could killing a few more models and again forcing Deathjack to keep out of my way. Cryx turn 2 and a blitz on my right destroyed my objective, and put Deneghra toeing my zone. I hadn't got anything that far forward for fear of getting attacked by Deathjack so went 3/0 down on scenario. In my turn I new I had to challenge the zone but was so intent on destroying things that half way through my turn I forgot. In my defence things didn't go my way, a fully charged Reckoner smashed into Deathjack (when assigning focus my intention was to put him toeing the zone whilst in combat, when i moved I put him at 2" reach for no reason and so gave away the game). However despite rolling 9 dice for damage 7 of them were 1's leaving him still standing. I feated at the end of my turn but it didn't matter as I gave the win away in my turn - FFS!!!!!
Anson Durst, Rock of the Faith vs. Captain E. Dominic Darius (Cygnar)
Loss: Scenario (5/0) This game was my best of the day, it was a fairly relaxed affair vs a small Cygnar army (also with a Stormwall). It turned into a cat and mouse affair with Stompy out-threating the Stormwall by 1". So every time that I moved forward 1" the stormwall would move back an inch. Between this and spending a turn assassinating the Black 13th with Stompy it meant that I didn't really contest the zone very solidly. I was also very scared of losing Stompy so didn't really make the most of my feat. I should have shoved him down the Cygnar throat into the zone before feating and then forcing him to deal with it. Instead each turn I contested the zone with chaff (first Zealots, then a Reckoner, then Choir and a Vassal). This piecemeal attacking was simply killed of each turn to mean the clock was slowly ticking over in the Cygnar favour. Eventually, with the scenario counter at 4/0 all I could do was run a choirman and Durst into the zone to find that the choir was blown into next week by the Stormwall and like an idiot I forgot Casters can't contest!! Doh
After the last game we went through how to use Durst's feat and I now feel much more confident on what I'm looking to do and being the one to ask the question rather than being really reactive.
2016 Win/Loss record to date: 8/27 (Protectorate 8/26 - Circle 0/1)
Tuesday, 19 April 2016
Stompys First Mammoth Night Outing
Feora, Protector of the Flame vs. Supreme Kommandant Irusk (Khador)
Loss: Scenario (5/0)
So Stompy (my Judicator) got his first outing at the club.
The game was against Khador and was a fairly light hearted affair. With the release of Mk3 in the not to distant future the fun element crept back in which was a nice addition.
End of game photo:

So the list was pretty much my tournament eFeora list with Flamebringers, Madelyn Corbeau and Anastacia Di Bray thrown into the mix. Idea being to use Madelyn to throw Anastacia close to the caster and then move everything into an assassination run.
I went first and amazed by the Daughters speed threw Ignite on them and ran them (18"!!!!!) at the Widowmakers - I figured they weren't Widower-makers so they should be fine. Everything else scampered forward and got ready to cause damage turn 2. In response the Khador right flanks advanced and trashed the Flamebringers, between Eiryss, Widowmakers (my theory was wrong) and Winterguard Rifles I lost 3 and the fourth was damaged. On the other side things were better and the shoting was ineffective.
My turn two and I paused for a thought (which probably saved the lives of numerous Zealots). Instead I activated Stompy and fired a barrage of shots into the Man-O-War unit, killing 1, setting 2 on fire and the scatter killing a pair of Doom Reavers. The other pod let rip at the Spriggan and managed to set it on fire. Next the Zealots mini-feated and walked into bomb range of the man-o-war and released some bombs. Not much happened, mainly due to lots of missing and the steam armoured brutes being immune to the blast damage. On the other side I tried my first cavalry charge on Eiryss, hitting the Widowmaker first the impact attack failed and that was it. The other one then did a standard charge on a widowmaker, killing it and then sidestepping into a second, killing that and ending in combat with Eiryss (well worth a note for the future!).
At the bottom of turn two the men-o-war and Doom Reavers charged the Zealots - they couldn't kill them but did jam the zone full of red bodies. The Great bears then ripped the two Flamebringers apart, Eiryss moved up and shot the Reckoner distrupting it. Finally the mortars took some shots at the judicator and managed to cause limited damage and kill a choirman. To finish up Irusk moved into the friendly zone to dominate leaving it 2/0 on scenario. Yes, it should have been 1 point for dominating a friendly zone but we both forgot at the time and I only realised whilst typing this out.
My turn 3 and Irusk was in the open and Stompy wasn't far away. He walked forward and let rip with both rocket pods and an ancillaried pod. This is some of the best shooting Stompy has ever done, by the end of the Khador control phase (after Cont. Fire) 7 winter guard rifles, 2 Great Bears and Kovnik Joe were dead. Additionally Irusk was on fire and had taken a bit of damage. I'd also killed another Doom Reaver and set on fire two Men-O-War with a flamethrower - go Stompy!! The only other thing of note was to toe the zone with the Reckoner and use the Zealots to kill two more Doom Reavers - leaving a single man left. One thing that worried me was his heavy near Stompy so I ran Rhoven and his bodyguards to intercept any charges that came that way. I felt kinda smug at this point, I believed I was winning the attrition game and even if the Reckoner died I'd only be 4/0 down ready to camp Stompy in Zone 2 next turn.
Khador turn 3 didn't go how I expected. The usually inaccurate mortars both targeted the Objective and obliterated it - at the time I thought they were going for damage on Feora (who was camped on ARM23 base to base behind it). However that was another scenario point for Khador - all that remained was to kill the Reckoner. It turns out the Spriggan has bulldoze, charging through he bashed the Reckoner out of the zone for the win.
I now realise that this should have been only 3/0 and the game result may have changed (this is to take nothing from my opponent who was just as oblivious as me and played the game very clinically), but that is entirely my fault yet again my absent mindedness has left me with a loss that could have been a victory. But on the positive, STOMPY SURVIVED!!!!!
So Stompy (my Judicator) got his first outing at the club.
The game was against Khador and was a fairly light hearted affair. With the release of Mk3 in the not to distant future the fun element crept back in which was a nice addition.
End of game photo:

So the list was pretty much my tournament eFeora list with Flamebringers, Madelyn Corbeau and Anastacia Di Bray thrown into the mix. Idea being to use Madelyn to throw Anastacia close to the caster and then move everything into an assassination run.
I went first and amazed by the Daughters speed threw Ignite on them and ran them (18"!!!!!) at the Widowmakers - I figured they weren't Widower-makers so they should be fine. Everything else scampered forward and got ready to cause damage turn 2. In response the Khador right flanks advanced and trashed the Flamebringers, between Eiryss, Widowmakers (my theory was wrong) and Winterguard Rifles I lost 3 and the fourth was damaged. On the other side things were better and the shoting was ineffective.
My turn two and I paused for a thought (which probably saved the lives of numerous Zealots). Instead I activated Stompy and fired a barrage of shots into the Man-O-War unit, killing 1, setting 2 on fire and the scatter killing a pair of Doom Reavers. The other pod let rip at the Spriggan and managed to set it on fire. Next the Zealots mini-feated and walked into bomb range of the man-o-war and released some bombs. Not much happened, mainly due to lots of missing and the steam armoured brutes being immune to the blast damage. On the other side I tried my first cavalry charge on Eiryss, hitting the Widowmaker first the impact attack failed and that was it. The other one then did a standard charge on a widowmaker, killing it and then sidestepping into a second, killing that and ending in combat with Eiryss (well worth a note for the future!).
At the bottom of turn two the men-o-war and Doom Reavers charged the Zealots - they couldn't kill them but did jam the zone full of red bodies. The Great bears then ripped the two Flamebringers apart, Eiryss moved up and shot the Reckoner distrupting it. Finally the mortars took some shots at the judicator and managed to cause limited damage and kill a choirman. To finish up Irusk moved into the friendly zone to dominate leaving it 2/0 on scenario. Yes, it should have been 1 point for dominating a friendly zone but we both forgot at the time and I only realised whilst typing this out.
My turn 3 and Irusk was in the open and Stompy wasn't far away. He walked forward and let rip with both rocket pods and an ancillaried pod. This is some of the best shooting Stompy has ever done, by the end of the Khador control phase (after Cont. Fire) 7 winter guard rifles, 2 Great Bears and Kovnik Joe were dead. Additionally Irusk was on fire and had taken a bit of damage. I'd also killed another Doom Reaver and set on fire two Men-O-War with a flamethrower - go Stompy!! The only other thing of note was to toe the zone with the Reckoner and use the Zealots to kill two more Doom Reavers - leaving a single man left. One thing that worried me was his heavy near Stompy so I ran Rhoven and his bodyguards to intercept any charges that came that way. I felt kinda smug at this point, I believed I was winning the attrition game and even if the Reckoner died I'd only be 4/0 down ready to camp Stompy in Zone 2 next turn.
Khador turn 3 didn't go how I expected. The usually inaccurate mortars both targeted the Objective and obliterated it - at the time I thought they were going for damage on Feora (who was camped on ARM23 base to base behind it). However that was another scenario point for Khador - all that remained was to kill the Reckoner. It turns out the Spriggan has bulldoze, charging through he bashed the Reckoner out of the zone for the win.
I now realise that this should have been only 3/0 and the game result may have changed (this is to take nothing from my opponent who was just as oblivious as me and played the game very clinically), but that is entirely my fault yet again my absent mindedness has left me with a loss that could have been a victory. But on the positive, STOMPY SURVIVED!!!!!
- Know the victory conditions - both to avoid mistakes and also (had the scenario been as we played it) I failed to see the destruction of the vulnerable objective of the critical 5th scenario point.
- Flamebringers are neither a frontline unit nor a jamming unit. By trying to use them out of character they were always going to die. They would have been better held in reserve to charge into the zone turn 2 and then used the bonus of being in combat to improve the survivability.
- Rhoven and Co were a waste yet again, I feel that I'd be better off using them as bodyguards for Stompy rather than hanging around behidn him.
- Equally Anastasia and Madelyn were wasted, hanging to far back there was no way that I could have got the advantages they provide. The four points could have been much better spent.
- I'm actually getting to grips with
Monday, 18 April 2016


Tuesday, 12 April 2016
Harlequins Spring Blast - 50pt Steamroller Tournament
Well the day of the tournament dawned and having seen the factions entered in advance, I knew I would learn something. Having never played Skorne there were three players entered and I drew one of them to start! It was also my first time using a Colossal so nothing like learning on the job.
Feora, Protector of the Flame vs. Xerxis, Fury of Halaak (Skorne)
Loss: Assassination (Scenario - 5/0)
You know its a tough draw when the press ganger running the tournament walks past pre game saying "Enjoy this, your opponent is quite good, he's in the Polish WTC team." In addition to that it was my first ever game vs Skorne with a list that I'd never used before...what could go wrong?!
Looking through the lists they didn't mean much to me, quite nicely my opponent went through the various units to give me an idea of the flavour of each. Not sure what to expect and having Stompy sat on my tray there was only ever going to be one list that I used first. My opponent dropped Xerxis on his mega beast and we started the game.
The game went really quick, I opted to go second hoping for a round of shooting at the bottom of turn 1. The Skorne advanced rapidly but equally everything was done very precisely which was interesting to watch. I had my go and aside from a few beasts being set on fire the highlight was a lucky scatter onto a Willbreaker killing him outright.
At the top of turn two a bit of boosting and suddenly Molik Karn was next to the remains of Stompy (a 16" threat and a beast weaponsmaster?!?!?). I spent the rest of the game reacting to my opponent, I managed to get revenge on Molik and a flying beast but ultimately I was loosing more each turn than I was killing. I then had the option of an assassination run but wimped out for fear of taking a free strike. Instead I went for it the next turn (this time taking 3 free strikes, non landed - eFeora is pretty hard!!), but with less focus due to a few deaths from flames and Xerxis sitting on 5 fury it was never going to happen.
The game finished at the top of turn 4, with the scenario counter going to 5/0 and Xerxis killing Feora leaving me with a Choirman and one of Rhovens bodyguards as the only models left on the table.
The only positive was that I was comfortably ahead on time and if I could have forced another turn from my opponent (who had around 5 mins remaining to my 15 mins) I could have possibly got the win. Worth noting in the future!

You know its a tough draw when the press ganger running the tournament walks past pre game saying "Enjoy this, your opponent is quite good, he's in the Polish WTC team." In addition to that it was my first ever game vs Skorne with a list that I'd never used before...what could go wrong?!
Looking through the lists they didn't mean much to me, quite nicely my opponent went through the various units to give me an idea of the flavour of each. Not sure what to expect and having Stompy sat on my tray there was only ever going to be one list that I used first. My opponent dropped Xerxis on his mega beast and we started the game.
The game went really quick, I opted to go second hoping for a round of shooting at the bottom of turn 1. The Skorne advanced rapidly but equally everything was done very precisely which was interesting to watch. I had my go and aside from a few beasts being set on fire the highlight was a lucky scatter onto a Willbreaker killing him outright.
At the top of turn two a bit of boosting and suddenly Molik Karn was next to the remains of Stompy (a 16" threat and a beast weaponsmaster?!?!?). I spent the rest of the game reacting to my opponent, I managed to get revenge on Molik and a flying beast but ultimately I was loosing more each turn than I was killing. I then had the option of an assassination run but wimped out for fear of taking a free strike. Instead I went for it the next turn (this time taking 3 free strikes, non landed - eFeora is pretty hard!!), but with less focus due to a few deaths from flames and Xerxis sitting on 5 fury it was never going to happen.
The game finished at the top of turn 4, with the scenario counter going to 5/0 and Xerxis killing Feora leaving me with a Choirman and one of Rhovens bodyguards as the only models left on the table.
The only positive was that I was comfortably ahead on time and if I could have forced another turn from my opponent (who had around 5 mins remaining to my 15 mins) I could have possibly got the win. Worth noting in the future!

Grand Scrutator Severius vs. Vladmir Tzepesci, The Dark Champion (Khador)
Win(ish): Scenario (2/0)
This was against my fellow Mammoth Chris. I dropped my usual Khador drop of pSevy (Voodoo People) into what turned out to be Vlad2. The game went really well and I managed to really mangle his army between 2 x Ashes to Ashes, the Vessel and the unkillable Temple Flameguard. The only hole in the plan was Vlad teleporting forward and blasting pSevy with two spells to kill him.
Rightly or wrongly at this point the Tournament Organiser stepped in to remind me that pSevy is untargetable by magic and that as the game had finished in an illegal gamestate we had to continue playing. We dropped Vlad back to pre-asasassination run and then continued, with the spell assassination off the table Chris' options were very limited. In response I moved the vessel behind Vlad and used a miracle to push him out of the zone. I then smashed the objective to put me two up on scenario for the win.
I have to say that it was a crap way to win, it was my lack of remembering my guys rules that got us to that stage so in my mind I should have lost. I maybe should have insisted on taking the loss and fought it a bit more but unfortunately it was done and round 3 beckoned.

This was against my fellow Mammoth Chris. I dropped my usual Khador drop of pSevy (Voodoo People) into what turned out to be Vlad2. The game went really well and I managed to really mangle his army between 2 x Ashes to Ashes, the Vessel and the unkillable Temple Flameguard. The only hole in the plan was Vlad teleporting forward and blasting pSevy with two spells to kill him.
Rightly or wrongly at this point the Tournament Organiser stepped in to remind me that pSevy is untargetable by magic and that as the game had finished in an illegal gamestate we had to continue playing. We dropped Vlad back to pre-asasassination run and then continued, with the spell assassination off the table Chris' options were very limited. In response I moved the vessel behind Vlad and used a miracle to push him out of the zone. I then smashed the objective to put me two up on scenario for the win.
I have to say that it was a crap way to win, it was my lack of remembering my guys rules that got us to that stage so in my mind I should have lost. I maybe should have insisted on taking the loss and fought it a bit more but unfortunately it was done and round 3 beckoned.

Feora, Protector of the Flame vs. Tyrant Xerxis (Skorne)
Win: Assassination (Scenario - 2/0)
Well the two lists threatened a mammoth in one and lots of beasts in the other so it was only every going to be Feora and the heavy hitters. My opponent didn't want to get list locked so opted for the anti-infantry mammoth list, this tilted the scales in my favour and I wanted to make sure I capitalised on it!
So having been demolished in round 1 I was a little more careful, there was also a bit of cat and mouse as both colossals had the same 11" threat and could both one round each other. I advanced cautiously and took pot shots around the board with the rockets.
On my right the zealots engaged and held up a unit of Croaks and Incindiarii for the whole game. On my other side I stupidly used my Enliven move to shift the Reckoner well out of control range. However he was advancing towards the enemy warlock so was causing a threat anyway.
I also managed to release a rocket barrage onto Xerxis setting him alight on turn 2. The enemy mammoth then advanced forward to what I thought was just out of range. I opted to stand and aim and blew some big chunks out of the gargantuan. However next turn my folly was show when my opponent declared a charge, measured the distance and trashed Stompy. To make matters worse I was next to a fuel cache so could have loaded up Stompy with four focus and charged for free, virtually guaranteeing a kill!
This distraction gave me what I needed however as Hand of Judgement got into charge range of Xerxis (who was on fire). Getting a free charge for him being on fire meant that the POW20 jack caused so much damage from his first two strikes that non of the Skorne jacks was healthy enough to transfer the full damage of the final hit meaning Xerxis had no choice but to take it himself which finished him off.
Well the two lists threatened a mammoth in one and lots of beasts in the other so it was only every going to be Feora and the heavy hitters. My opponent didn't want to get list locked so opted for the anti-infantry mammoth list, this tilted the scales in my favour and I wanted to make sure I capitalised on it!
So having been demolished in round 1 I was a little more careful, there was also a bit of cat and mouse as both colossals had the same 11" threat and could both one round each other. I advanced cautiously and took pot shots around the board with the rockets.
On my right the zealots engaged and held up a unit of Croaks and Incindiarii for the whole game. On my other side I stupidly used my Enliven move to shift the Reckoner well out of control range. However he was advancing towards the enemy warlock so was causing a threat anyway.
I also managed to release a rocket barrage onto Xerxis setting him alight on turn 2. The enemy mammoth then advanced forward to what I thought was just out of range. I opted to stand and aim and blew some big chunks out of the gargantuan. However next turn my folly was show when my opponent declared a charge, measured the distance and trashed Stompy. To make matters worse I was next to a fuel cache so could have loaded up Stompy with four focus and charged for free, virtually guaranteeing a kill!
This distraction gave me what I needed however as Hand of Judgement got into charge range of Xerxis (who was on fire). Getting a free charge for him being on fire meant that the POW20 jack caused so much damage from his first two strikes that non of the Skorne jacks was healthy enough to transfer the full damage of the final hit meaning Xerxis had no choice but to take it himself which finished him off.
Feora, Protector of the Flame vs. Absylonia, Daughter of Everblight (Legion)
Loss: Assassination & Scenario (5/0)
Well having played 2/3 Skorne players, sadly I didn't get the set. Instead I got to play Legion which having played numerous games at the club I was quite happy about. Even better was that neither list included a Blight Bringer or Ravagore, happy days!
I opted for eFeora again as being fire proof I hoped that she could avoid some assassination runs that were bound to come my way. Equally my opponent was list locked to taking eAbby who I know from experience hasn't got any offensive spells meaning Sevy would most likely spend the game quaking in terror.
The scenario had two large circles in the middle which needed controlling or dominating. I decided to go second and thought I'd throw all my might at the right hand side and use the Zealots to contest the left. This also meant that I'd be throwing all my jacks head long against the Legion Heavy Beasts, I hoped that I could soften them up on the way in and by doing so survive the alpha and then smash back harder.
It all started well with Judy setting Abby and two heavies on fire at the bottom of turn 1, additionally I managed to roll 6, 6, 6 and a 5 & 6 for the blast damage forcing Abby to pass on the damage to her beasts - maybe this could be a third win to put me in the top quarter?!?
The downfall to my plan was my need to contest zones meaning that I advanced quicker than I'd have liked. This meant that instead of hanging back a little I moved forward and the limited frontage meant that my Jacks and troops blocked each other in. A feat at the top of turn 3 placed a Scythean and Carnivean next to Stompy and once again he fell down. I also lost a Reckoner the same turn. Counter charges from Rhoven and the Hand of Judgement killed a Raek and got revenge for Stompy but they couldn't get in the zone. I was now down 1/0 on scenario.
More importantly the blight wasps were making a problems of themselves for the Zealots and so I was given the opportunity and charged the remaining 2 wasps. This meant them leaving the left zone with a single zealot but I figured it was only a secnario point and they'd be back the following turn.
Big mistake, with the zone up for grabs Abby jumped in and killed the zealot, dominating the zone. Already contolling the right zone the remaining legion went to town on the zealots killing them all. The wasps now free then blocked access to the left zone except through them. Scenario was also at 4/0.
This left me with a problem, I needed to contest both zone otherwise I won, to this end I easily contested the right zone with Hand of Judgement. Feora then finished off the wasps to allow two choir through to the left hand zone. I knew this wasn't enough but with nothing else to send I just had to hope. Scenario clock was at 4/1
Sadly it wasn't to be, Abby hopped forward, shredded the choir and then won quite happily 6/1.
A great days gaming and so much learnt, now I just need to put it into practice next time. Also at 2 wins 2 losses I was quite happy with my performance!!
I tried to keep the descriptions shorter as with four games if I went to much into them then this post would be huge, hope no one minds!!!
2016 Win/Loss record to date: 8/22 (Protectorate 8/21 - Circle 0/1)
Monday, 11 April 2016
Mk3?!
Wow they're redoing the game, the internet is a-flutter the speculation is rife.
On a personal note I'm just really looking forward to a level playing field as everyone relearns the game. Hopefully mark 3 will be my chance to shine!
Wednesday, 6 April 2016
Building My New Judicator!!!
Since going to my first tournament and seeing the various colossals
I've really wanted one. I'd been holding out for a Revelator but I
can't see them appearing any time soon and having sold some Warhammer
the money was burning a hole in my pocket! Luckily I found a new one
for a good price second hand from Facebook and so I ordered it straight
away!
At this point I should say that I didn't have the idea of doing a blog post on assembling him (I should have done but the excitement overwhelmed and I jumped into it). However, Chris suggested it would be good to read and I agreed that it may help anyone assembling a Judicator in the future. So here it is, my guide/experience assembling a Judicator (painting will hopefully come later).


1) Preparation
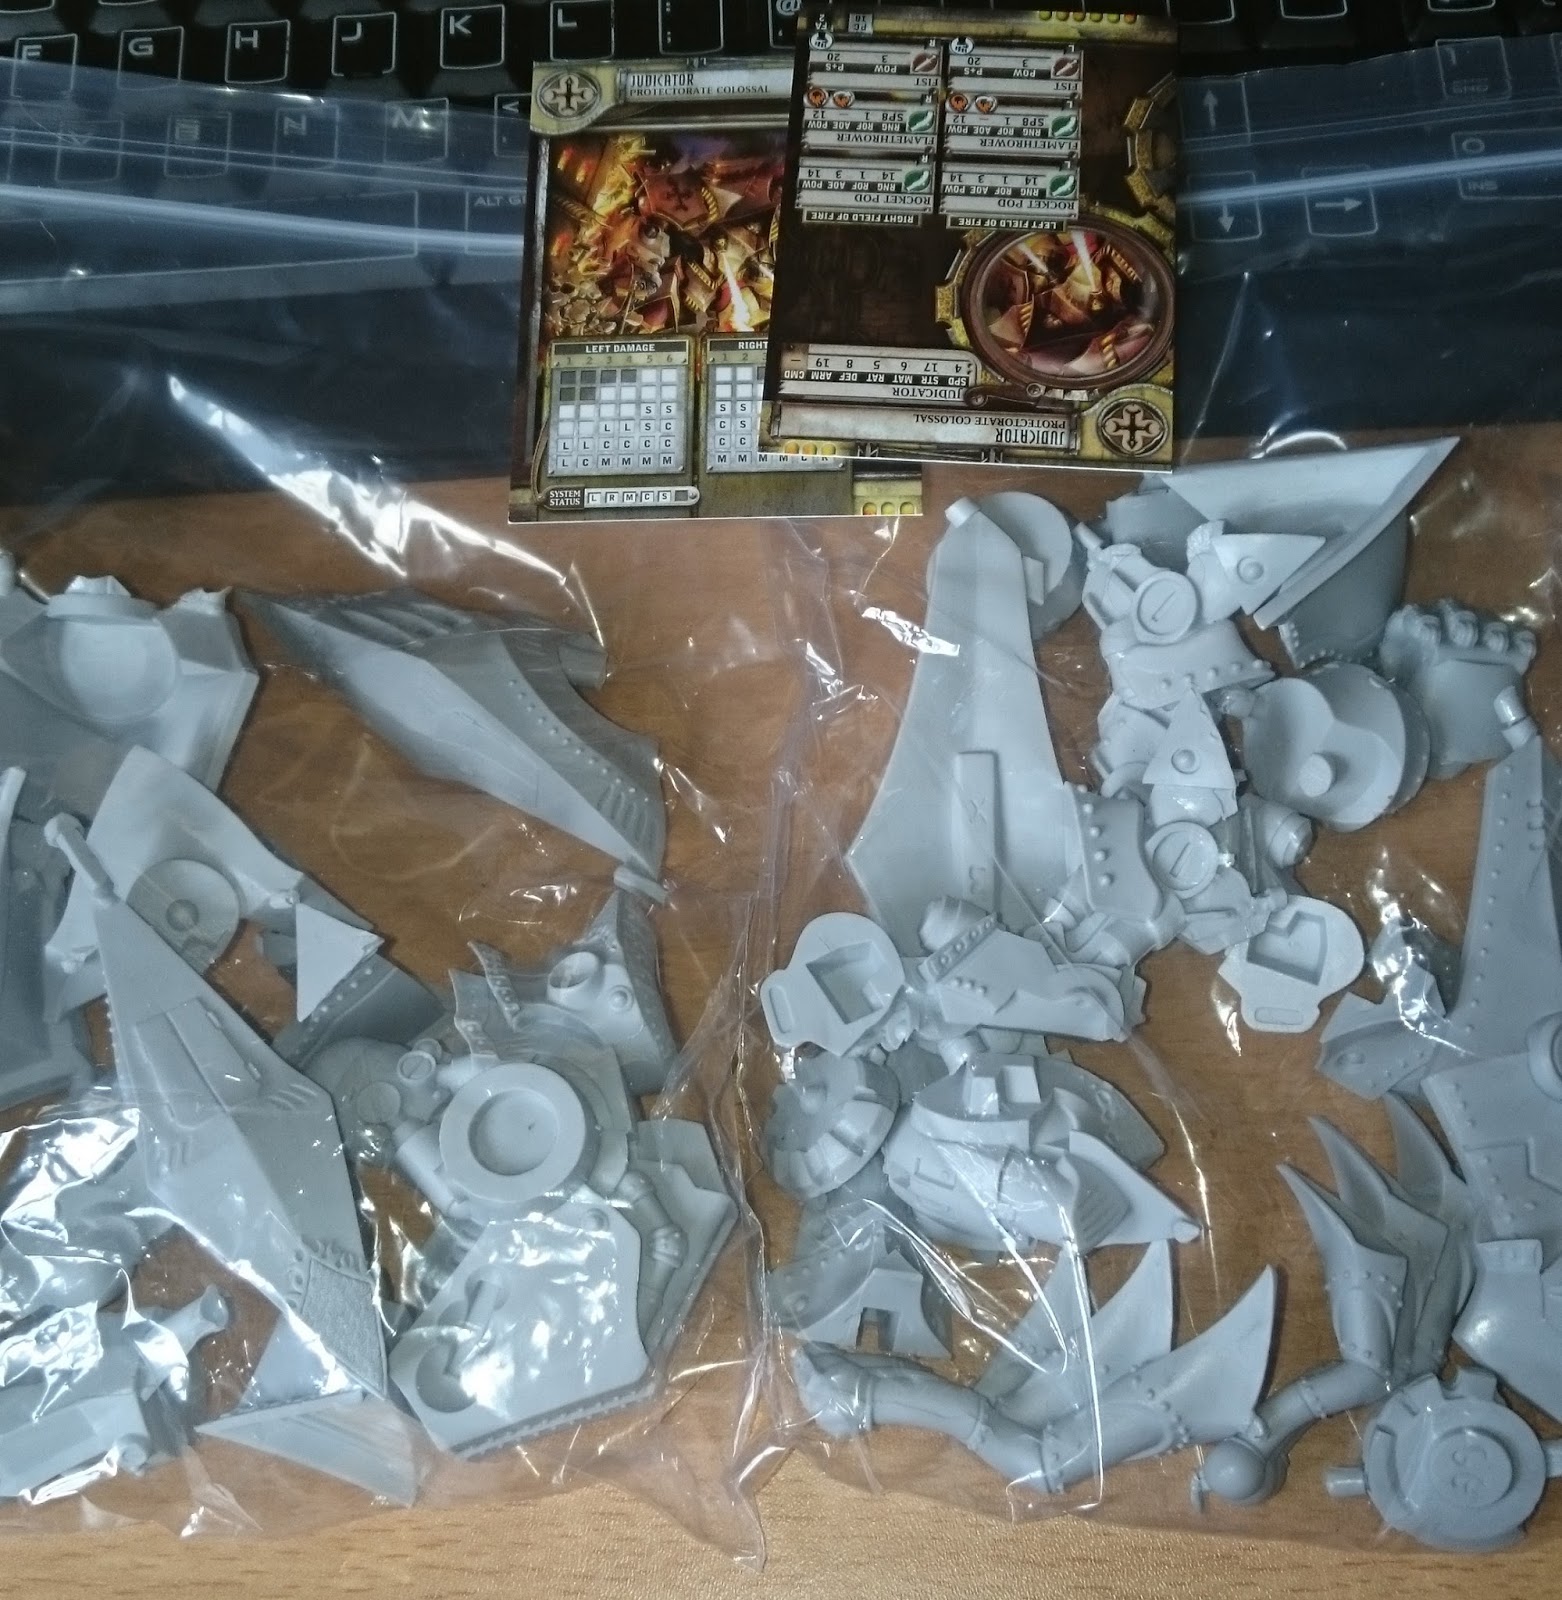
The first thing you will notice when you get the bits out is the sheer volume of excess material on the bits. I've highlighted the below photo to try to give you an idea:

Whilst I understand that this is pretty much the norm for resin kits and its just part of the process, I think its worth while highlighting how long it actually takes to clean up all of the pieces. Having spent good money on the kit its worth spending the effort making sure every surface is smooth and the tags have all been completly removed and filed back. This should aid the bonding process but also improve the aesthetics when it comes to painting.
2) Base-Hips
The bottom of the model was the easiest part to put together. The key thing to note here are that the legs come with the front unattached to it feels at first like they're being attached backwards.
The first parts I glued together were the hip joints for both legs. These are preshaped sockets similar to those on the plastic jacks (so you can't get them backwards :-) ). I then attached the toes/front of feet and stood them on a plastic sheet to ensure that they dried as flat as possible. I was a little worried when I checked before gluing that they could be angled to down which would have been a nightmare to attach to the base, so I hoped by standing up early on it would avoid this.
Before I attached any more I decided to glue the feat to the base. My thinking behind this is that I could hold the model by the base as I assembled it and hopefully not put to much excess stress on the newly glued parts. I got he alignment from looking at photos online and from placing the torso above to get an idea of where it looked like it was facing - its essentially an angry left foot forward stance! I then left this for a good half hour to dry pretty solid.
3) A note on metal parts and pinning
In the final phtoos below you will see the silver coloured metal parts in the model. With the exception of what I will call the Elbow connectors these can all be attached after everything else so I left them till the end.
For all of the pinning on the model I used a 1mm bit and paper clips. Whilst I know others have used brass rod paperclips are both what I had and also what I am familiar with. I also didn't want to go putting too bigger holes in the model.
4) Hips-Torso
So my first bit of pinning on Stompy (this name appeared later on when I was cursing at him and the rocket pods), the ball and socket joint that attachs the torso to the hips. Whilst I know that ball and socket joints are fairly solid once dry I also know that they can be a pain to hold in place whilst the glue dries as they slip very easily. As this was also the single joint supporting the entire upper half of the miniature there was no way I wasn't pinning this and making my life easier!
So first I drilled into the centre of the socket and inserted a pin. I positioned the torso in postion and applied pressure to leave a mark in the resin. I then took it apart and drilled where the mark was left - this resin stuff makes this easy!
After that I glued it all together and also glued on the exhaust funnels, armour panel above the head and the head itself - well everyone needs a face. I also glued on the thigh shielding to the legs as these were the last resin parts on the legs.

5) Torso-Missile Pods
So I'm thinking, I'm half of the way through the build and not really had any issues at all, this colossal thing is easy - heres where Stompy hit back. The missile pods (diamond shape below) attach to the top of a disk that in turn attaches neatly using a circular key into a circular hole in the arm socket (see dodgy diagram below!)

My main problem in hindsight was that I was trying to angle the pods too high (35-45 degree angle) as thats how I'd envisoned them working. However at this angle they interfere with the exhaust vents. I then thought I must have attached the exhaust vents wrong (please note this is actually impossible based on the inserts and differnet size shapes) so gently popped them off to take another look. I realised my mistake, and the fact that the rocket pods should be pretty much horizontal (depending how you positioned the waist).
This next part was my most frustrating bit, I had to reattach the exhausts, glue the disk to the torso and the missile pod to the disk. I decided to do this all at once as it would ensure that the whole lot would fit and I wouldn't then find I couldn't attach another part. The first arm (that I hadn't glued at all when I attempted first time) went on super and with a little bit of tweaking was on and sorted. Well the next one is the same surely?! No, as this had already started to be glued it wouldn't stick solid like the first. Also the guide on the disk and the guide on the pod didn't lock in the same as the other side. However, after numerous shouts of "You -****ing Stompy ******d" (and so Judy was Christened) and some really helpful laughter from my wife, I got it all attached and vowed to let it dry before I went anywhere near it again! I also checked the shoulder pads would fit in place properly which required a little tweaking - worth doing now though before it all dried!
6) Shoulders
The good bit about this is that the arms and shoulders are probably best assembled separately first and then attached in the final stage. This mean that stage 5 could dry whilst I was doing them.
The shoulders are each amde up of a large shoulder pad, a barrel shaped insert and a metal elbow joint. I pinned each piece to each other as I thought the entire arm would take the most leverage so would need to be as strong as possible. The pins were drilled in line with the way the parts fitted together (see below in red).

I also drilled a pin horizonatlly into the should to attach to to the disk on the rocket pod. Again this was to strengthen the whole arm as I didn't think that the cutouts bonded together as well as they could do. I didn't attach this to the main model until stage 8 though.
7) Arms
The forearms, hands and shields all went together really well and seeing as there was no weight on them I couldn't really envisage them needing it. The part that would need the strength is the ball and part socket joint at the elbow. I assume that this is the reason it is made out of metal to save it sheering off if excess force is applied.
However again thanks to the softer nature of the resin I was able to drill into the metal socket and then use a little pressure to accurately put a mark on the ball to mark where I needed to drill. Again I checked it all went together ok but didn't glue them to the shoulders.
8) Putting it all together!
Having spent the time making sure the pins were all in the right place, all that remained was to slowly and carefully glue it all together. I'm actually surprised how well it all went together, first the shoulders to the torso and then the arms to the elbows.
9) Missile Pods & Metals
With all the resin parts attached all the remainign metal was atatched. The knees, nipple guns, Reliquary (metal bit on top) and boiler were glued into place - nice and easy!
The last bit was the missile heads and missile port covers that were fairly straight forward just very tricky. I may well regret attaching them as I can see them getting knocked off very easily. Ah well, at least it is fully assembled for the moment.
10) Done!!!
Well it only took around 4 hours but well worth it! And here are the photos of one fully assembled Judicator - aka Stompy!


At this point I should say that I didn't have the idea of doing a blog post on assembling him (I should have done but the excitement overwhelmed and I jumped into it). However, Chris suggested it would be good to read and I agreed that it may help anyone assembling a Judicator in the future. So here it is, my guide/experience assembling a Judicator (painting will hopefully come later).
So whats in the box?
- 59 resin and metal parts to make the model (24 part are the rocket tips and port covers)
- Card wreck marker
- 2 x Stat Cards
- Instrutions sheet - I use the word instruction very loosely!
The "Instructions"
Hmm yes well, whilst they are functional and show how everything goes together, an A6 photocopied sheet do not the instructions for a £80+ model make.
The assembly
The first thing you will notice when you get the bits out is the sheer volume of excess material on the bits. I've highlighted the below photo to try to give you an idea:

Whilst I understand that this is pretty much the norm for resin kits and its just part of the process, I think its worth while highlighting how long it actually takes to clean up all of the pieces. Having spent good money on the kit its worth spending the effort making sure every surface is smooth and the tags have all been completly removed and filed back. This should aid the bonding process but also improve the aesthetics when it comes to painting.
2) Base-Hips
The bottom of the model was the easiest part to put together. The key thing to note here are that the legs come with the front unattached to it feels at first like they're being attached backwards.
The first parts I glued together were the hip joints for both legs. These are preshaped sockets similar to those on the plastic jacks (so you can't get them backwards :-) ). I then attached the toes/front of feet and stood them on a plastic sheet to ensure that they dried as flat as possible. I was a little worried when I checked before gluing that they could be angled to down which would have been a nightmare to attach to the base, so I hoped by standing up early on it would avoid this.
Before I attached any more I decided to glue the feat to the base. My thinking behind this is that I could hold the model by the base as I assembled it and hopefully not put to much excess stress on the newly glued parts. I got he alignment from looking at photos online and from placing the torso above to get an idea of where it looked like it was facing - its essentially an angry left foot forward stance! I then left this for a good half hour to dry pretty solid.
3) A note on metal parts and pinning
In the final phtoos below you will see the silver coloured metal parts in the model. With the exception of what I will call the Elbow connectors these can all be attached after everything else so I left them till the end.
For all of the pinning on the model I used a 1mm bit and paper clips. Whilst I know others have used brass rod paperclips are both what I had and also what I am familiar with. I also didn't want to go putting too bigger holes in the model.
4) Hips-Torso
So my first bit of pinning on Stompy (this name appeared later on when I was cursing at him and the rocket pods), the ball and socket joint that attachs the torso to the hips. Whilst I know that ball and socket joints are fairly solid once dry I also know that they can be a pain to hold in place whilst the glue dries as they slip very easily. As this was also the single joint supporting the entire upper half of the miniature there was no way I wasn't pinning this and making my life easier!
So first I drilled into the centre of the socket and inserted a pin. I positioned the torso in postion and applied pressure to leave a mark in the resin. I then took it apart and drilled where the mark was left - this resin stuff makes this easy!
After that I glued it all together and also glued on the exhaust funnels, armour panel above the head and the head itself - well everyone needs a face. I also glued on the thigh shielding to the legs as these were the last resin parts on the legs.

5) Torso-Missile Pods
So I'm thinking, I'm half of the way through the build and not really had any issues at all, this colossal thing is easy - heres where Stompy hit back. The missile pods (diamond shape below) attach to the top of a disk that in turn attaches neatly using a circular key into a circular hole in the arm socket (see dodgy diagram below!)

My main problem in hindsight was that I was trying to angle the pods too high (35-45 degree angle) as thats how I'd envisoned them working. However at this angle they interfere with the exhaust vents. I then thought I must have attached the exhaust vents wrong (please note this is actually impossible based on the inserts and differnet size shapes) so gently popped them off to take another look. I realised my mistake, and the fact that the rocket pods should be pretty much horizontal (depending how you positioned the waist).
This next part was my most frustrating bit, I had to reattach the exhausts, glue the disk to the torso and the missile pod to the disk. I decided to do this all at once as it would ensure that the whole lot would fit and I wouldn't then find I couldn't attach another part. The first arm (that I hadn't glued at all when I attempted first time) went on super and with a little bit of tweaking was on and sorted. Well the next one is the same surely?! No, as this had already started to be glued it wouldn't stick solid like the first. Also the guide on the disk and the guide on the pod didn't lock in the same as the other side. However, after numerous shouts of "You -****ing Stompy ******d" (and so Judy was Christened) and some really helpful laughter from my wife, I got it all attached and vowed to let it dry before I went anywhere near it again! I also checked the shoulder pads would fit in place properly which required a little tweaking - worth doing now though before it all dried!
6) Shoulders
The good bit about this is that the arms and shoulders are probably best assembled separately first and then attached in the final stage. This mean that stage 5 could dry whilst I was doing them.
The shoulders are each amde up of a large shoulder pad, a barrel shaped insert and a metal elbow joint. I pinned each piece to each other as I thought the entire arm would take the most leverage so would need to be as strong as possible. The pins were drilled in line with the way the parts fitted together (see below in red).

I also drilled a pin horizonatlly into the should to attach to to the disk on the rocket pod. Again this was to strengthen the whole arm as I didn't think that the cutouts bonded together as well as they could do. I didn't attach this to the main model until stage 8 though.
7) Arms
The forearms, hands and shields all went together really well and seeing as there was no weight on them I couldn't really envisage them needing it. The part that would need the strength is the ball and part socket joint at the elbow. I assume that this is the reason it is made out of metal to save it sheering off if excess force is applied.
However again thanks to the softer nature of the resin I was able to drill into the metal socket and then use a little pressure to accurately put a mark on the ball to mark where I needed to drill. Again I checked it all went together ok but didn't glue them to the shoulders.
8) Putting it all together!
Having spent the time making sure the pins were all in the right place, all that remained was to slowly and carefully glue it all together. I'm actually surprised how well it all went together, first the shoulders to the torso and then the arms to the elbows.
9) Missile Pods & Metals
With all the resin parts attached all the remainign metal was atatched. The knees, nipple guns, Reliquary (metal bit on top) and boiler were glued into place - nice and easy!
The last bit was the missile heads and missile port covers that were fairly straight forward just very tricky. I may well regret attaching them as I can see them getting knocked off very easily. Ah well, at least it is fully assembled for the moment.
10) Done!!!
Well it only took around 4 hours but well worth it! And here are the photos of one fully assembled Judicator - aka Stompy!


Pre Tournament Prep - eHaley & Stormwall
Feora, Protector of the Flame vs. Major Victoria Haley (Cygnar)
Loss: Scenario (5/0)
I forgot to get a photo of this one, sorry Ladies and Gents.
I'll keep this one brief, the game was just before the tournament at Harlequins. Having only ever faced a colossal once (aside from the Blight Bringer) I wanted to find one to play, equally the last tournament had two double Stormwall lists with eHaley. So with this in mind I organised a game with the local eHaley & Stormwall player.
I took my armour cracking eFeora list with the hope of smashing the Colossal and then using the Zealots to hold everything else until this happened.
It all went to plan with the exception of my inability to roll decent dice. In a single round a Vanquisher, Reckoner and Rhoven and Co charged the Stormwall and failed to cause more than 50% damage. At this point it all started to go horribly wrong, the Stormwall then proceeded to smash the Jacks and buy time. The Zealots worked well holding a unit of heavy cavalry up for the whole game.
Seeing Jacks falling over lead me to go for a hail-mary assassination run on eHaley. Looking back it was never going to work by the time I'd spent enough focus to get to where I needed to go I realised that due to the dead jack remains in the way I couldn't make the charge. So instead I paused and camped the two remaining focus and left her stood behind the Stormwall. Without a jack for escort and on only ARM19 the Stormwall turned around and promptly squashed her.
I forgot to get a photo of this one, sorry Ladies and Gents.
I'll keep this one brief, the game was just before the tournament at Harlequins. Having only ever faced a colossal once (aside from the Blight Bringer) I wanted to find one to play, equally the last tournament had two double Stormwall lists with eHaley. So with this in mind I organised a game with the local eHaley & Stormwall player.
I took my armour cracking eFeora list with the hope of smashing the Colossal and then using the Zealots to hold everything else until this happened.
It all went to plan with the exception of my inability to roll decent dice. In a single round a Vanquisher, Reckoner and Rhoven and Co charged the Stormwall and failed to cause more than 50% damage. At this point it all started to go horribly wrong, the Stormwall then proceeded to smash the Jacks and buy time. The Zealots worked well holding a unit of heavy cavalry up for the whole game.
Seeing Jacks falling over lead me to go for a hail-mary assassination run on eHaley. Looking back it was never going to work by the time I'd spent enough focus to get to where I needed to go I realised that due to the dead jack remains in the way I couldn't make the charge. So instead I paused and camped the two remaining focus and left her stood behind the Stormwall. Without a jack for escort and on only ARM19 the Stormwall turned around and promptly squashed her.
- Colossals are neither as big or as scary as I made out.
- eHaleys feat is absolutely brutal, essentially unless you have a gun you lose a turn.
- I need to stop doing hail-mary assassination runs I'd have been much better off camping all the focus, waiting another turn and then seeing where I was rather than throwing the game away.
Subscribe to:
Posts (Atom)